Little bunny dresses are playful, bunny-themed dresses for children, often featuring bunny prints, 3D bunny ear accents, and detailed bunny and carrot appliques.
This guide is perfect for parents, caregivers, or anyone interested in sewing unique bunny-themed dresses for children.
Bunny-themed dresses often include playful designs like bunny prints and appliqués, and many feature floral prints and pastel colors, making them suitable for spring events. Bunny dresses for girls are especially popular for spring and Easter occasions. These charming outfits are especially popular for spring and Easter celebrations, thanks to their whimsical designs and festive appeal. This guide will show you how to make your very own bunny dress.
Are you a parent or caregiver interested in DIY children’s clothing? If so, making little bunny dresses is a wonderful way to create something unique and memorable for your little ones. Not only are these dresses adorable, but they also make special outfits for occasions like Easter, spring parties, or any day your child wants to feel extra playful. The process is fun and rewarding, and the finished dress is sure to bring joy to both you and your child.
- Bunny Dress Styles and Occasions
- Introduction to Dress Making
- Planning Your Design
- Gathering Your Sewing Supplies
- Measuring and Pattern Making
- Making the Bunny Paws Pockets
- Creating the Bunny's Sweet Face
- Adding the Floppy Bunny Ears
- Assembling Your Baby Bunny Dress
- Finishing Touches for a Perfect Easter Dress
- Tips and Tricks
Bunny Dress Styles and Occasions
Bunny dresses for kids are available in various styles and designs. From classic pinafores with bunny appliqués to modern dresses with 3D ears and playful prints, there’s a style for every personality. Bunny dresses for girls are popular for spring and Easter occasions, but they can also be styled for casual outings, birthday parties, and special events. Whether you prefer a simple cotton dress for everyday wear or a more elaborate design with tulle and ruffles for celebrations, bunny dresses offer versatility and charm for many occasions.
Note: Little bunny dresses are especially popular for spring and Easter celebrations, and their playful designs—like bunny prints, 3D ears, and cute appliques—make them a favorite choice for festive occasions.
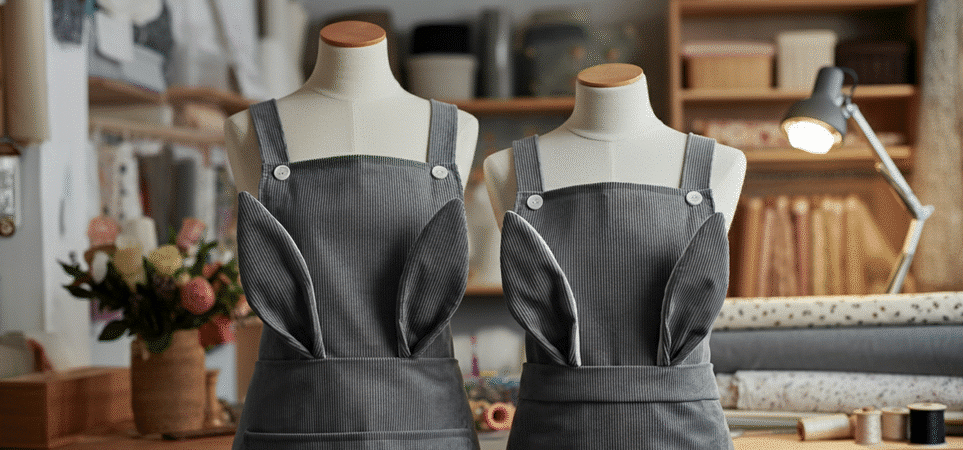
I made two little bunny dresses for my toddlers, and I’m still not over how cute they turned out. My little ones are completely obsessed with bunnies. They have bunny stuffed animals, bunny pajamas, you name it. For Easter, I wanted to make something special for them. I found a lovely pattern for a mouse dress and decided to adapt it. This project was so much fun, and the result was absolutely adorable. The girls squealed when they saw their new outfits. Seeing their faces light up made every stitch worth it. It’s a simple project, perfect for a quiet afternoon.
Introduction to Dress Making
Dress making is a delightful and creative hobby, especially when you’re crafting something special for babies and toddlers. There’s nothing quite like seeing your little one in a handmade bunny dress, perfect for Easter or any playful day. With just a few basic tools and a bit of imagination, you can create unique dresses that stand out from anything you’ll find in stores.
When you’re searching for inspiration, try using keywords like “bunny dress” or “Easter dresses” to discover a variety of patterns and ideas online. Before you get started, it’s a good idea to check the price and stock of your chosen fabrics and supplies—this way, you can add everything you need to your cart without any last-minute surprises. Choosing the right size and type of fabric is key to making sure your dress is both comfortable and adorable. Whether you’re making a classic bunny dress or something with a modern twist, a little planning goes a long way toward a beautiful result.
Safety and Comfort Considerations
When making dresses for babies and toddlers (ages 0-3), always prioritize safety and comfort. Avoid small, detachable pieces that could pose choking hazards. Choose soft, breathable fabrics like cotton or cotton blends to keep your child comfortable throughout the day. For babies and toddlers, look for dress designs that include snap closures for easy diaper access, and opt for secure closures like buttons or snaps, which are often easier for young children to manage than zippers. If your dress includes tulle, lace, or netting, ensure there is a soft cotton lining to prevent irritation against sensitive skin.
Now that you understand the basics and have some inspiration, let’s move on to planning your design.
Planning Your Design
Planning your design is where the magic begins! Think about the occasion—maybe it’s a family Easter gathering, a birthday, or just a day to celebrate your baby’s love of bunnies. Consider the child’s personality and what style would make them smile. Adding a sweet bow or a pop of pink can make your dress extra special, but don’t be afraid to get creative with colors and embellishments you love.
Before you start cutting fabric, check the sizing chart for your pattern to ensure the best fit. If you’re new to sewing or want to brush up on your skills, sign up for a sewing class or follow an easy online tutorial. There are so many resources available to help you every step of the way. Using easy-to-follow patterns and taking your time with each step will help you create a dress that’s not only beautiful but also made with love. The planning stage is your chance to dream up a design that’s as unique as your little one.
Once you have your design in mind, it’s time to gather your sewing supplies.
Gathering Your Sewing Supplies
Before you start, you’ll need a few things. Here is a list of what you’ll need for one dress. I doubled everything since I was making a pair.
- Grey Cord Fabric: About 1.5 meters, but this depends on the dress size.
- Contrasting Lining Fabric: Get the same amount as the cord fabric.
- Fabric Scraps: You’ll need small pieces of black and pink for the face and ears.
- Bondaweb: This is great for attaching the small face pieces.
- Pink Thread: This will be for the whiskers and other small details.
- Two Pink Buttons: These will go on the shoulders.
- Grey Wool: For making a fluffy pom-pom tail.
I started by printing and cutting out my dress pattern. Then, I cut two front pieces and two back pieces from both the grey cord and the lining fabric. I made sure the grain of the cord fabric ran down the length of the dress. The pattern has a slightly lower neckline at the front.
With your supplies ready, the next step is to measure and create your pattern.
Measuring and Pattern Making
Before you even pick up your scissors, taking the time to measure properly is the secret to a bunny dress that fits just right. For little girls who love to twirl, a true-to-size fit means more comfort and more fun—so grab your measuring tape and jot down those numbers! Whether you’re making a pink Easter bunny dress or a classic country-inspired style, accurate measurements ensure your dress will be worn, twirled, and loved on repeat.
When creating your pattern, think about the features that make your dress special. Do you want a skirt with extra twirl? Bunny ears that stand out? Each detail, from the type of fabric to the size of the embellishments, adds to the overall look and feel. The complexity of your pattern can also affect the price if you’re buying a ready-made dress, as well as the stock available in your favorite shop.
If you’re shopping online, you’ll notice that each dress comes with a detailed description, including size options, SKU numbers, and care instructions. These details help you sort through the options and find the perfect fit for your little one. Once you’ve found a bunny dress you love, it’s easy to add it to your cart and place your order. Don’t forget to check the care instructions to keep your dress looking its best, and consider pairing it with cute shoes to complete the look.
Whether you’re sewing at home or browsing for the perfect Easter outfit, taking the time to measure, choose the right type, and pay attention to the little features will ensure your bunny dress is a hit. After all, it’s all about creating something your girls will want to wear, twirl, and repeat—season after season, with love.
Once your pattern is ready and measurements are set, you can start making the adorable bunny details.
Making the Bunny Paws Pockets
Next up were the pockets, which double as the bunny’s paws. This part is so sweet. I cut two oval shapes from the cord and two from the lining fabric. Each piece was about 9cm across.
Step-by-step instructions:
- Sew each pocket with the right sides of the fabric together.
- Use a 1cm seam allowance.
- Leave a small gap at the bottom so you can turn it right-side out.
- Once turned, iron them flat.
- Cut out paw shapes from the pink fabric scraps.
- Attach Bondaweb to the back of the paw shapes.
- Carefully press the paw shapes onto the pocket pieces.
- Sew the pockets onto the front of the dress, placing them near the bottom to allow for the hem turn-up.
With the pockets in place, it’s time to bring your bunny’s face to life.
Creating the Bunny’s Sweet Face
Now for the face! This is where the dress really starts to show its personality.
- Cut two small oval shapes from the black fabric for the eyes.
- Use Bondaweb to iron them into place on the front of the dress.
- For the nose, use a scrap of pink material. Cut out a small nose shape, attach the Bondaweb, and iron it on.
- Mark three lines on each side of the nose with tailor’s chalk for the whiskers.
- Stitch over the lines with your sewing machine using pink thread.
Once the face is finished, you can move on to adding the signature bunny ears.
Adding the Floppy Bunny Ears
After the face was done, I moved on to the ears.
- Cut ear shapes from the pink fabric.
- Attach Bondaweb to the back of the fabric pieces.
- Iron the ears into place, positioning them right near the top edge of the dress front. This placement is important for how they look later.
The whole process felt like bringing a little character to life on the fabric.
With the face and ears complete, you’re ready to assemble the main dress pieces.
Assembling Your Baby Bunny Dress
Sewing the Main Dress Pieces
- Place the front and back cord pieces side by side.
- Sew them together with the right sides of the fabric facing each other, using a 1cm seam allowance.
Attaching the Lining
- Repeat the same process for the lining pieces, but sew the opposite sides together.
- Press the seams open.
Finishing the Edges
- Pin both the main dress and the lining together, right sides facing.
- Sew along the neck and armholes.
- Snip the curved edges to help them lie flat.
- Turn the dress right-side out and give it a good press.
- Sew the remaining open sides together.
With the main structure complete, it’s time to add the finishing touches that make your bunny dress perfect for Easter or any special day.
Finishing Touches for a Perfect Easter Dress
Attaching Buttons and Ears
- Along the bottom of the dress, turn the fabric up twice to create a 1cm hem and sew it in place to keep the edge from fraying.
- Attach the buttons: place the button on the back piece of the dress shoulder strap and the buttonhole on the front strap. This setup helps the ears stand up nicely and prevents half the ear from getting lost in the shoulder seam.
Adding the Pom-Pom Tail and Final Details
- Tack the pom-pom tail onto the back of the dress, right around the bum line.
Practical features and tips:
- Voluminous tulle skirts and ruffle hems add whimsy and twirl potential.
- Puff sleeves and twirl-friendly skirts make little bunny dresses extra special.
- Many bunny-themed dresses come with matching accessories or items, such as panty or headbands for younger sizes.
- Typically available in various sizes to fit different age groups.
- These dresses are often machine washable, making them practical for everyday wear.
And just like that, the project was complete. Creating these two little bunny dresses was such a joyful experience.
In summary: Little bunny dresses are a delightful choice for spring and Easter celebrations, thanks to their playful designs and festive details. Whether you make your own or buy one, these dresses are sure to bring smiles and twirls to your little one’s day!
Tips and Tricks
Choosing the Right Fabric
To make your bunny dress project a success, a few handy tips and tricks can make all the difference. Start by choosing a soft, comfortable fabric—cotton or leggings material are great options for little ones who love to move and play.
Adding Playful Details
Adding a bunny-themed appliqué or a bit of embroidery can give your dress a playful, custom touch that’s sure to delight.
Reading Patterns and Tutorials
Always read through your pattern instructions before you begin, and don’t hesitate to ask for help or look up a quick tutorial if you get stuck. Keeping your sewing area tidy and using the right tools will help you work more efficiently and achieve a polished finish.
Finishing Touches
When making dresses for babies and toddlers, remember to leave a little extra room for growth so your creation can be enjoyed for longer. Pairing the dress with a cute set of leggings or other accessories can complete the look and make it even more practical for everyday adventures. With a bit of patience and practice, you’ll be making beautiful, one-of-a-kind dresses that your child will love to wear.


