

Key Takeaways
- Easy salt dough ornaments use just flour, table salt, and water, and thin pieces can be ready to decorate the same afternoon.
- You have two drying choices: bake at 200–250°F for 1.5–3 hours, or let ornaments air dry for 4–7 days.
- Kids can use cookie cutters, handprints, footprints, and even pet paw prints to create personalized christmas ornaments.
- Roll the dough evenly, about 1/4 inch for cut shapes and slightly thicker for handprints, then poke holes before drying.
- To preserve salt dough ornaments for many seasons, let them dry fully, seal both sides, and store them away from moisture.
Why Salt Dough Ornaments Are Perfect for Kids
Salt dough is one of those classic kitchen-table crafts that never really goes out of style. It is simple, inexpensive, and perfect for rainy days, school breaks, or a cozy christmas project before decorating the christmas tree. With a basic salt dough ornament recipe, kids can turn pantry staples into homemade ornaments full of personality.
Making ornaments with kids combines sensory play and creativity. Children get to squish, roll, press, stamp, and cut the dough, then choose colors and decorations later. If your kids love colorful projects, they might also enjoy exploring vibrant weekend craft ideas that use paint, paper, and simple recycled materials. That makes salt dough crafts especially good for younger kids who learn best by using their hands.
There are learning benefits, too. Kids can measure flour and salt, count cookie cutters, compare sizes, and follow step-by-step instructions. It is a fun craft that quietly teaches ratios, patience, and cause-and-effect.
Salt dough handprint ornaments are a wonderful way to create keepsakes that capture a child’s growth and milestones, making them perfect gifts for grandparents or cherished family decorations. Years later, those little fingers pressed into dough can bring back fond memories.
Compared with store-bought clay or craft kits, dough ornaments are budget-friendly and use ingredients you may already have. You do not need fancy tools, and the whole family can help, though a few DIY craft kits for kids and adults can be handy to keep on hand for quick projects during school breaks or weekends.

Simple Salt Dough Recipe for Kids
This is an easy recipe sized for a small family craft session. The recipe makes about 15–20 small to medium homemade salt dough ornaments, depending on how many ornaments you cut and how thick you roll the dough.
Ingredients
Ingredient | Amount |
|---|---|
all-purpose flour | 2 cups |
table salt | 1 cup |
warm water | 1 cup |
To make salt dough, combine 2 cups of all-purpose flour, 1 cup of salt, and 1 cup of water in a large mixing bowl, mixing until a dough forms. | |
Regular table salt gives smoother dough ornaments than coarse or kosher salt. If you want the smoothest surface for painting, use fine table salt or regular table salt rather than chunky salt. |
Store-brand all purpose flour works well and keeps the project affordable. Avoid self-rising flour and self rising flour because leavening agents can make ornaments puff up while they bake.
The finished dough should feel like play dough: smooth, pliable, not sticky, and not crumbly. If it sticks to your hands, add more flour one spoonful at a time. If it crumbles, gradually add a teaspoon or two of water until it comes together.
Optional: add a few drops of food coloring to the water before mixing if you want tinted easy salt dough. This works best for simple shapes that will not be heavily painted later, and pairs nicely with other paint-based projects like creative glue paint crafts on paper or cardboard.
Supplies and Tools You’ll Need
Most tools for homemade salt dough ornaments are common kitchen items and simple craft supplies.
You will need:
- large bowl or large mixing bowl
- wooden spoon or dough whisk
- rolling pin
- baking sheet, cookie sheet, or two flat trays
- parchment paper or silicone mats
- wire cooling rack
- spatula for lifting cut ornaments
- plastic wrap, ziploc bag, or airtight container for extra dough
For shaping, gather:
- cookie cutters in stars, trees, circles, gingerbread people, bells, or hearts
- a round cookie cutter or small bowl for handprints
- butter knife for trimming edges
- cookie stamps for texture or patterns
For holes and details, use:
- drinking straw
- skewer or toothpick
- buttons, lace, leaves, or other textured objects
- stamps for names, shapes, or patterns
For decorating later, set aside:
- acrylic paint, craft paint, or washable tempera
- paint brush and cotton swabs
- markers or paint pens
- glitter, sequins, beads, ribbons, bows, or small bells
- mod podge, spray sealer, or polyurethane spray
- ribbon, twine, or an ornament hanger
Unlike food posts with required recipe ratings, this is a flexible craft project. You can review recipe texture as you go and adjust with a little flour or water.
How to Make Salt Dough Ornaments Step by Step
This is the main how to make salt dough section. Adults should supervise young kids, especially around the oven, sharp tools, and small embellishments.
1. Mix the dough
Add the flour and salt to a large mixing bowl and stir with a wooden spoon. Gradually add warm water while stirring until the mixture starts to clump together.
Once it becomes too thick to stir, switch to clean hands. Press the dough together until no dry flour remains at the bottom of the bowl.
2. Knead until smooth
Knead the dough for about 5-10 minutes until it is smooth and pliable, similar to the texture of play dough.
Kids can help with this part. Kneading also helps smooth out air bubbles that may cause uneven surfaces later.
If the dough feels wet, dust the counter with more flour. If it feels dry and cracked, wet your hands and knead again.
3. Roll to an even thickness
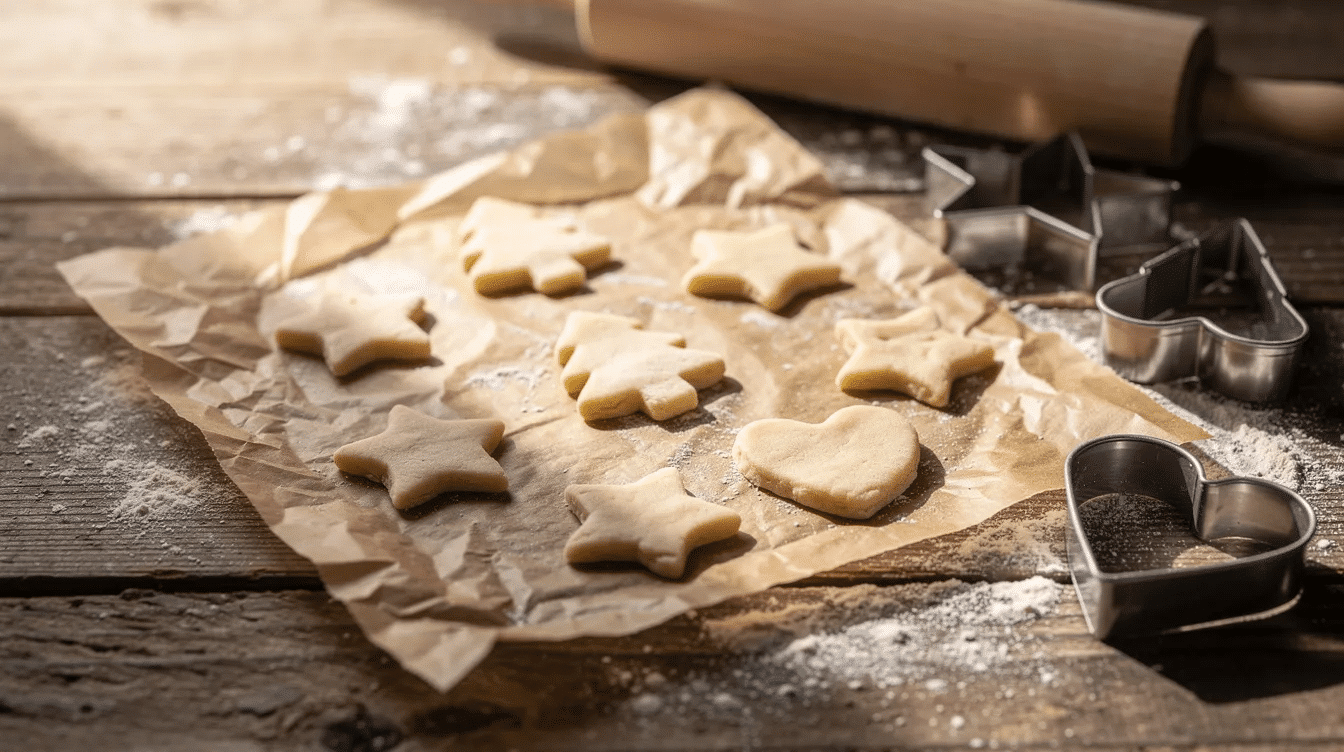
Roll the dough between two sheets of parchment paper or directly on a lightly floured counter. Roll the dough out to about 1/4 inch thick and use cookie cutters to cut out shapes for ornaments, making sure to poke a hole for hanging.
For most cut shapes, 1/4 inch is the desired thickness. For handprints, you can go closer to 1/2 inch, but thicker ornaments need a longer drying process.
Even thickness matters. Thin edges can brown, while thick centers can stay damp. If you want a simple guide, place two wooden rulers or chopsticks on either side of the dough and roll over them.
4. Cut shapes
Using cookie cutters, you can create a variety of shapes for salt dough ornaments, allowing for endless creativity and personalization in your holiday decorations.
Press the cookie cutter straight down, wiggle gently, and lift. Move each ornament carefully with a spatula. Re-roll scraps and cut shapes until the dough is used up.
Ask older kids to comment something they like about each other’s designs before decorating. It keeps the activity collaborative instead of competitive.
5. Smooth edges
Dip a fingertip in water and gently smooth rough edges. You can also use the blunt end of a skewer to neaten corners or clean up small details.
This little step makes finished ornaments look much cleaner after paint and sealer.
Making Handprint and Footprint Keepsake Ornaments
A handprint ornament is especially meaningful for babies, toddlers, and pets because it freezes a tiny stage of life in a simple keepsake. If your kids like animal themes, you can also try winter polar bear handprint crafts for a cozy afternoon activity.
Roll a slightly thicker circle of dough, about 1/2 inch thick. Press a child’s hand or foot firmly into the center, then lift straight up to avoid smudging the print.
If the print is too light, knead the dough again and try once more. A clear print usually needs steady pressure across the fingers, palm, and heel of the hand.
Use a round cookie cutter or small bowl to trim around the print so it looks centered and tidy. You can write the child’s name, age, or year with a toothpick before drying.
Pet paw prints work the same way. Gently press the paw into the dough, then wipe the paw right away to remove any dough or salt. Salt dough is not safe to eat due to its high salt content, so keep pets from licking it.
Making Holes and Getting Ready to Dry
Hanging holes must be made before baking or air drying. If you forget, you may need to glue on an ornament hanger later.
Use a drinking straw or skewer to poke holes near the top of each ornament. Leave enough dough above the hole so the ornament will not crack when it hangs.
Gently twist the straw to remove a neat circle of dough. Smooth raised edges with a fingertip.
Transfer the ornaments to a parchment-lined baking sheet or cookie sheet, spacing them slightly apart. Add initials, names, or the year with a toothpick before drying.
Drying Options: Bake or Air Dry Salt Dough
You can bake or air dry salt dough. Baking is faster and more reliable when you want to decorate the same day. Air drying is a no bake option that avoids oven use, but it takes longer and works best in a dry room.
To bake salt dough ornaments, preheat the oven to 200-250°F and bake for 1.5 to 3 hours, depending on the thickness of the ornaments, until they are firm and dry to the touch.
Bake the salt dough ornaments in a preheated oven at 200-250°F for 1.5 to 2 hours, checking for firmness and dryness. Thin pieces often finish in that window, while thicker handprint ornaments may need more time.
Place trays on the middle rack. For thick pieces, flip carefully halfway through so both sides dry evenly. Let ornaments cool on the tray or rack before painting.
Air drying salt dough ornaments can take 4 to 7 days, while baking them in the oven is a faster method that guarantees they will harden properly. To air dry, place ornaments on a wire rack or parchment-lined tray in a warm, low-humidity room and turn them once per day.
If the salt dough ornaments puff up during baking, it may be due to using self-rising flour or uneven thickness; baking at a lower temperature can help prevent this. If edges brown too quickly, move the tray to the middle of the oven, lower the oven temperature, or loosely tent with foil.
Checking When Ornaments Are Fully Dry
Fully dried dough ornaments should feel firm, not cool, damp, or flexible. The color should be fairly even, with no dark or soft patches.
Tap the back lightly. A dry piece will feel solid and may sound firmer, while a damp piece feels dull or soft.
Do not rush this step. After decorating, wait until the ornaments are fully dry before sealing them, as sealing damp ornaments can trap moisture inside, leading to deterioration.
Very thick handprint ornaments may need extra oven time on low heat or additional days of air drying. When fully dry, they should feel close to rock hard.
How to Decorate Salt Dough Ornaments with Kids
Let ornaments cool completely before painting. This is the moment kids usually love most, because the plain dough becomes a tiny keepsake, character, or decoration.
Acrylic craft paint is the best choice for bright, lasting color. Washable tempera works for very young children, but it should be sealed well after drying.
Simple ideas include:
- solid-color backgrounds
- polka dots made with cotton swabs
- stripes in red, green, gold, blue, or silver
- gingerbread faces
- snowman buttons
- painted trees with tiny dots for lights
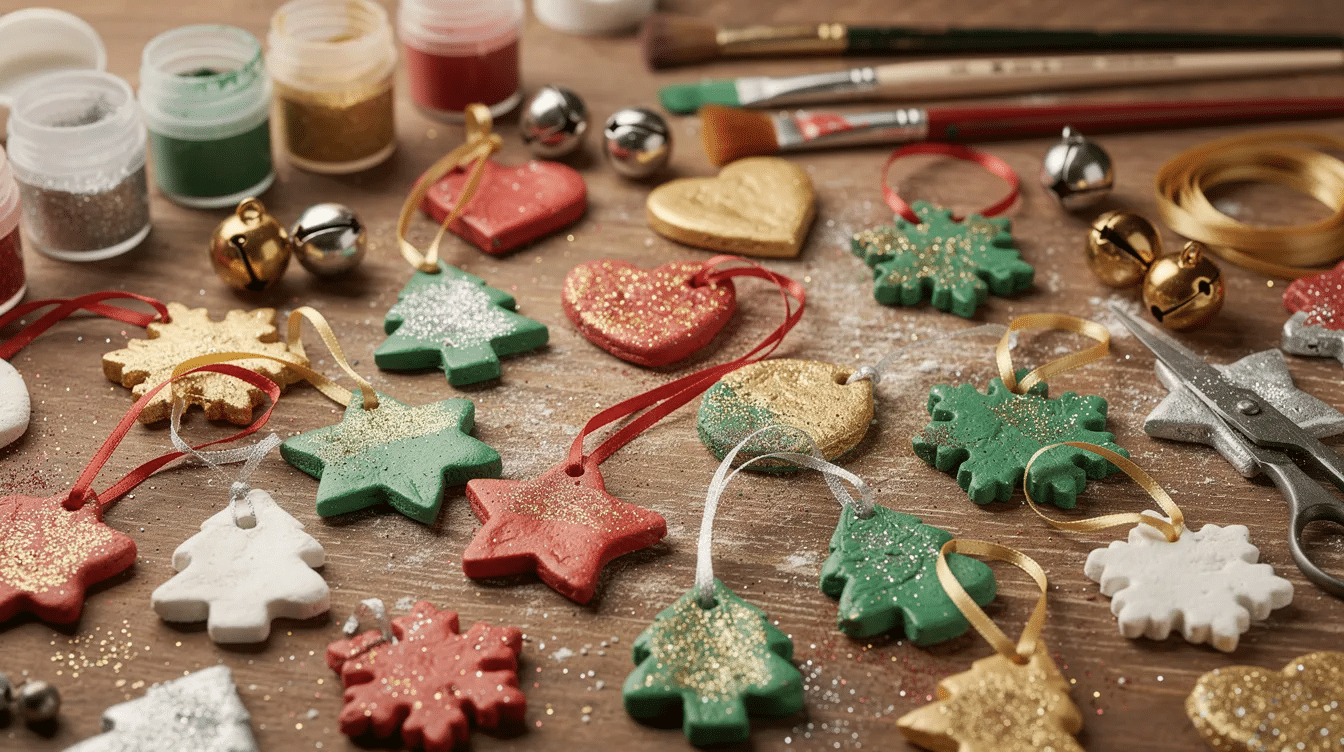
To add a unique touch to your salt dough ornaments, consider decorating them with acrylic paints, glitter, or even small embellishments like beads and ribbons after they have dried.
Once base coats are dry, add details with markers or paint pens. Names, dates, “Christmas 2026,” and short messages make each ornament more personal.
You can sprinkle glitter onto wet paint, glue on tiny pom-poms, add sequins, or tie a small bow above the hole. For younger kids, keep embellishments large enough to avoid choking hazards.
Natural-style designs work beautifully, too. Try simple white paint, jute twine, and a tiny bit of greenery for rustic dough ornaments that look lovely on a minimalist Christmas tree.
Fun Decoration Ideas and Themes
Try one of these themed sets:
Theme | Ideas |
|---|---|
Classic Christmas | trees, stars, candy canes, stockings, bells |
Winter animals | penguins, polar bears, foxes, owls |
Keepsakes | handprints, footprints, paw prints, names, dates |
Fingerprint art | snowmen, reindeer, light strings, tiny ornaments |
Rustic style | white paint, twine, natural textures, muted colors |
Turn a child’s thumbprint into a snowman by painting it white and adding a hat, scarf, and buttons with a thin brush. A brown fingerprint can become a reindeer with antlers and a red nose. | |
Seasonal palettes help the set look cohesive. Use red, green, and gold for traditional christmas ornaments, or icy blues and silvers for a winter look. You can expand the fun into a whole season of crafting by making other festive Christmas craft projects like paper ornaments, gift tags, or handmade photo coasters. |
For handprint keepsakes, write the child’s age or “Baby’s First Christmas” and the year. Older kids can try plaid, chevrons, tiny holly leaves, or borders around round ornaments.
Sealing, Hanging, and Storing Your Ornaments
Sealing is what helps homemade ornaments survive more than one season. Salt dough is porous, so it can absorb moisture from the air if left unsealed.
It’s essential to apply a clear sealant to salt dough ornaments to protect them against moisture, mold, and deterioration over time, helping them last a lifetime.
To preserve your finished dried salt dough ornaments, you can coat them with a layer or two of Mod Podge or spray with a clear sealer, ensuring to seal both sides for best results.
Mod Podge is a good brush-on option for most family projects. Apply a thin layer on one side, let it dry, flip, and repeat on the back and edges. Use a light coat rather than one heavy coat.
Adults can use spray sealer or polyurethane spray outdoors or in a well-ventilated area. Follow the product directions and let everything cure fully before packing away.
To hang, thread ribbon, baker’s twine, jute, or an ornament hanger through the hole. Tie a loop and add a small bell or wooden bead if you like.
For storage:
- wrap each ornament in tissue paper or bubble wrap
- place ornaments in a sturdy, dry box
- add silica gel packets if your home is humid
- avoid damp basements, garages, and hot attics
- store finished ornaments flat when possible
Well-sealed and carefully stored salt dough ornaments can last for decades and become part of your yearly Christmas traditions. Around springtime, you can carry that same spirit of making keepsakes into DIY Easter bonnet crafting with kids.

Frequently Asked Questions
Can I make salt dough ornaments ahead of time?
Yes. You can make salt dough ahead by mixing the dough a day or two before crafting, wrapping it tightly in plastic wrap, and storing it in the fridge.
Unused salt dough can be stored in an airtight container for over 5 days. A ziploc bag also works if you press out extra air before sealing.
Let chilled dough sit at room temperature for 20–30 minutes before rolling. Finished but undecorated ornaments can also be baked, fully dried, and stored in an airtight container until kids are ready to paint, which makes them easy to pull out alongside at-home balloon birthday decorations when you are getting ready for a party.
Is it possible to make gluten-free salt dough ornaments?
Yes, gluten free flour blends can work, but the dough may be more fragile. Choose a gluten-free flour mix that contains starches and gums rather than a single-ingredient flour.
Add water slowly because gluten-free dough can become sticky quickly. If needed, dust the surface with extra flour and handle the cut ornaments gently.
How can I stop my ornaments from puffing or cracking?
Puffing usually happens when the dough is too thick, the oven is too hot, or self-rising flour is used instead of plain flour.
Roll evenly, keep most shapes around 1/4 inch, and use a low oven temperature for a longer bake. Cracking often happens when ornaments dry too quickly or are moved while hot, so let them cool completely on the tray or rack.
Are salt dough ornaments safe around pets and small children?
Salt dough is not edible. The high salt content can be dangerous for pets and very young children if eaten. When you are decorating for celebrations, treat ornaments like you would balloon garlands or party balloon arches and displays and keep them out of reach of little ones.
Supervise kids during crafting, keep leftover dough out of reach, and hang finished ornaments higher on the tree where pets cannot grab them.
Can I skip baking and only air dry my ornaments?
Yes. Air dry salt dough is a valid no-bake option if ornaments are kept fairly thin and turned every day.
Air drying usually takes several days in a warm, dry room. Fully air-dried ornaments should still be sealed with Mod Podge, clear spray sealer, or another clear finish so moisture does not move back into the dough over time. Once your ornaments are ready to hang, they make sweet additions to themed celebrations, whether you are planning whimsical fairy balloon decorations or a magical unicorn party setup.


