

This tutorial walks you through making a colorful, kid-friendly Duck Tape Christmas wreath with your preschooler, using affordable supplies and zero hot glue.
Key Takeaways
- This duck tape christmas wreath tutorial from Little Button Diaries uses a 12-inch foam wreath form (or a free cardboard ring), rolls of Duck Tape in Christmas colors, and scissors. No hot glue gun is needed for the basic version, so preschoolers ages 3 to 6 can safely participate under adult supervision.
- Families can finish the wreath in roughly 60 to 90 minutes, making it a perfect December weekend craft. The steps involve cutting tape strips, folding them into leaf shapes, and overlapping them around the wreath form until the base is fully covered. A full-size wreath requires around 90 leaves made from duct tape.
- Because the wreath uses duct tape instead of real greenery, the finished piece is lightweight, durable, and reusable every Christmas when stored properly. Kept indoors in a dry spot, it can last several holiday seasons without peeling.
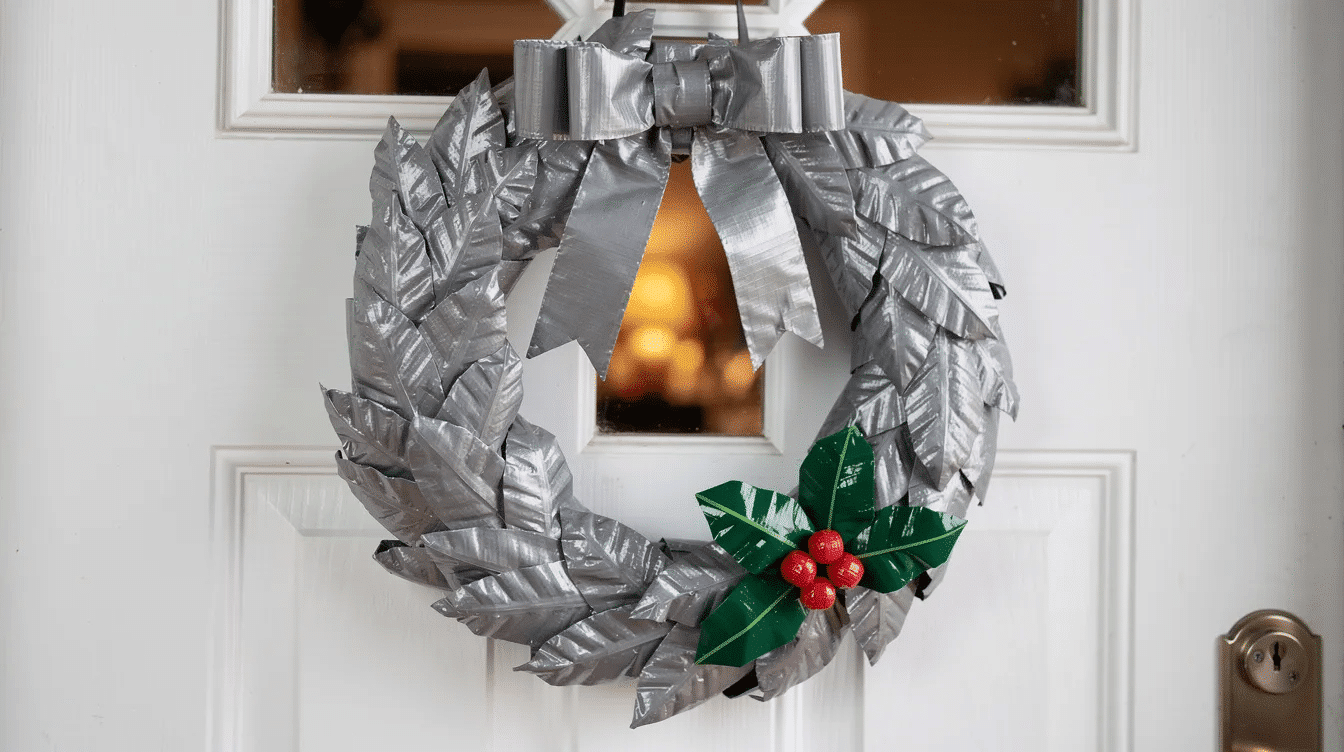
- The tutorial covers three looks: a classic red-and-green layered duct tape wreath, a metallic “mixed metal” style using gold and silver tape, and an unconventional diy pleated wreath made with patterned tape for a more modern texture.
- Every step includes kid-involvement tips, from choosing colors and counting leaves to pressing pieces onto the ring, so little ones stay engaged and proud of the finished result.
Introduction: Why Make a Duck Tape Christmas Wreath?
Early December is the moment when kids start asking to put up decorations. The tree, the stockings, the front door. If you have a preschooler, you know they want to help with all of it. This wreath gives them a real job in the process.
A duck tape wreath is a circle of foam or cardboard covered in folded or pleated strips of tape “leaves” instead of evergreen branches. Green duct tape serves as the primary base for most versions, though red, plaid, metallic, and patterned tapes all work. Duct tape is versatile for wreath-making; you can fold it, pleat it, fringe it, or layer it flat depending on the look you want.
This craft fits the Little Button Diaries approach: low-cost materials, simple steps, and genuine participation from small children. If you already have scissors and a few rolls of colorful tape at home, you might spend nothing at all. If you love the idea of making a playful recycled Christmas wreath from upcycled materials, this project uses that same spirit with sticky tape as the star material.
A quick note on the name: “Duck Tape” is a specific brand owned by Shurtape Technologies, launched in 1980, that now offers over 200 colors and prints including glitter, glow-in-the-dark, and mirror finishes. Generic duct tape refers to any cloth-backed, rubber-adhesive tape and tends to come in plain gray or basic colors with fewer decorative options. For this craft, branded Duck Tape gives you the fun patterns and bright colors that make the wreath pop, but any duct tape works structurally. Using colored or patterned duct tape enhances wreath aesthetics and keeps kids interested.
Below, you will find the full supply list, step-by-step instructions, kid-involvement tips, and variation ideas for making this wreath your own.
Supplies and Prep for Your Duck Tape Wreath
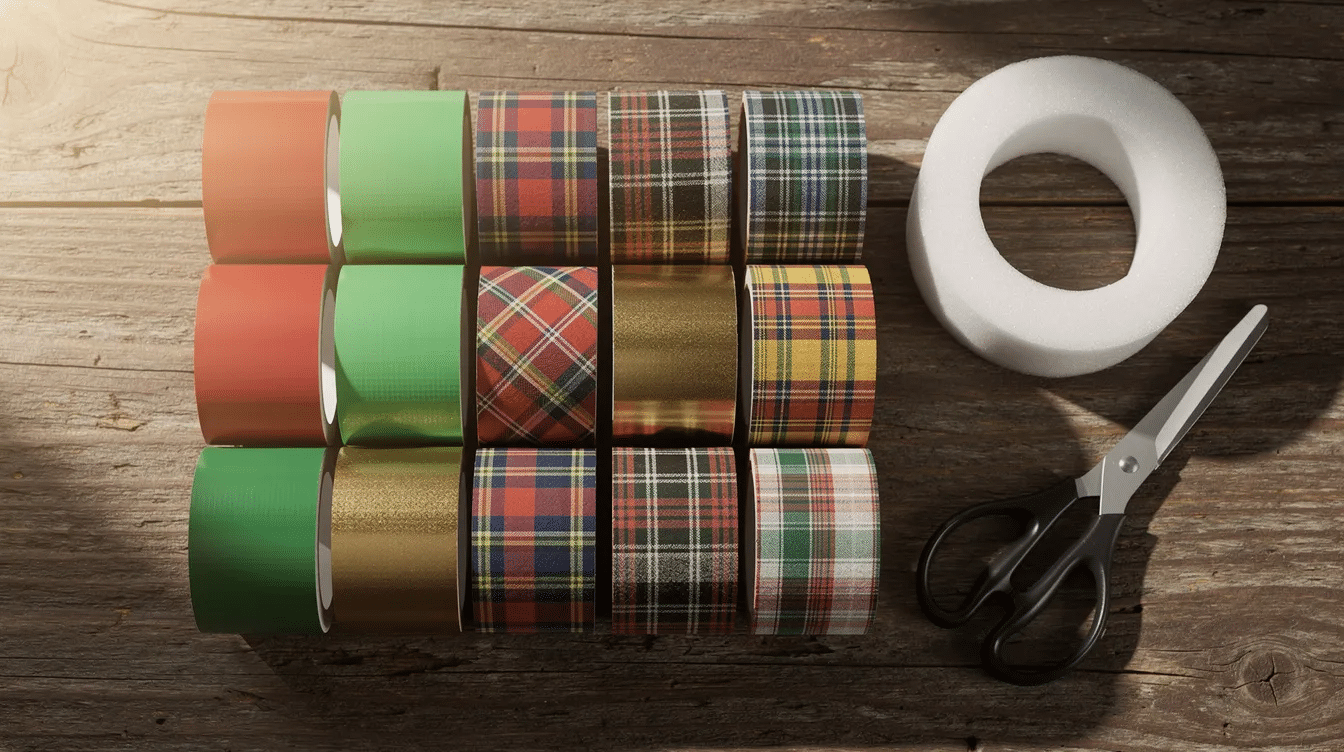
Gathering your supplies before you start keeps the craft moving and prevents the “I need to find the scissors” interruption that loses a four-year-old’s attention. Here is what you need.
Supply list
Item | Approx. US Price (2026) | Notes |
|---|---|---|
12-inch foam wreath form | $5–$8 each | Sold at Michaels, Hobby Lobby, or Amazon. A foam wreath form typically measures 12 inches for standard door-size wreaths. |
Cardboard ring (DIY option) | Free | Trace a large dinner plate for the outer circle and a small bowl for the inner circle onto a cereal box or shipping box. Adult should cut with a craft knife. |
Duck Tape or duct tape, 2–3 rolls in Christmas colors | ~$9–$10 per roll retail | Red and green plaid, metallic gold, silver, snowflake print, candy cane stripe, or glitter tape. Duck tape designs can repeat every 5 inches, so patterned rolls create a consistent look across leaves. |
Standard scissors | Household item ($3–$5 if buying child-safe pair) | Scissors are essential for making clean cuts through duct tape. Round-tip child-safe scissors work for older kids; adults handle cutting for toddlers. |
Pencil and ruler | Household items | For measuring tape strips and marking the cardboard ring. |
Optional extras
- Thin floral wire ($3 for a small spool); cut into lengths of 4 to 5 inches for bendable leaf or petal shapes in the metallic variation
- Pipe cleaners, felt scraps, jingle bells ($2–$4 per pack); better for kids age 5 and up due to small parts
- Battery-operated fairy lights, 10-light string ($5–$10); adults thread these after assembly
- Red duct tape for bows and accents; a half roll is plenty for one wreath
Total estimated cost for one wreath: $25–$35 if buying all new; less if you reuse tape rolls or an upcycled cardboard base.
Prepping the workspace
Cover your table with newspaper or a plastic tablecloth. Duct tape adhesive can leave residue on surfaces. If you are using cardboard instead of a foam wreath, trace your circles now and have an adult cut the ring. The foam option is ready to go straight from the package; you need a foam wreath form to give the tape something solid to grip.
Set out the tape rolls, scissors, and a ruler. Pre-cut a few sample strips so your child can see what the finished pieces look like before you begin.
Step-by-Step: Classic Duck Tape Christmas Wreath Tutorial
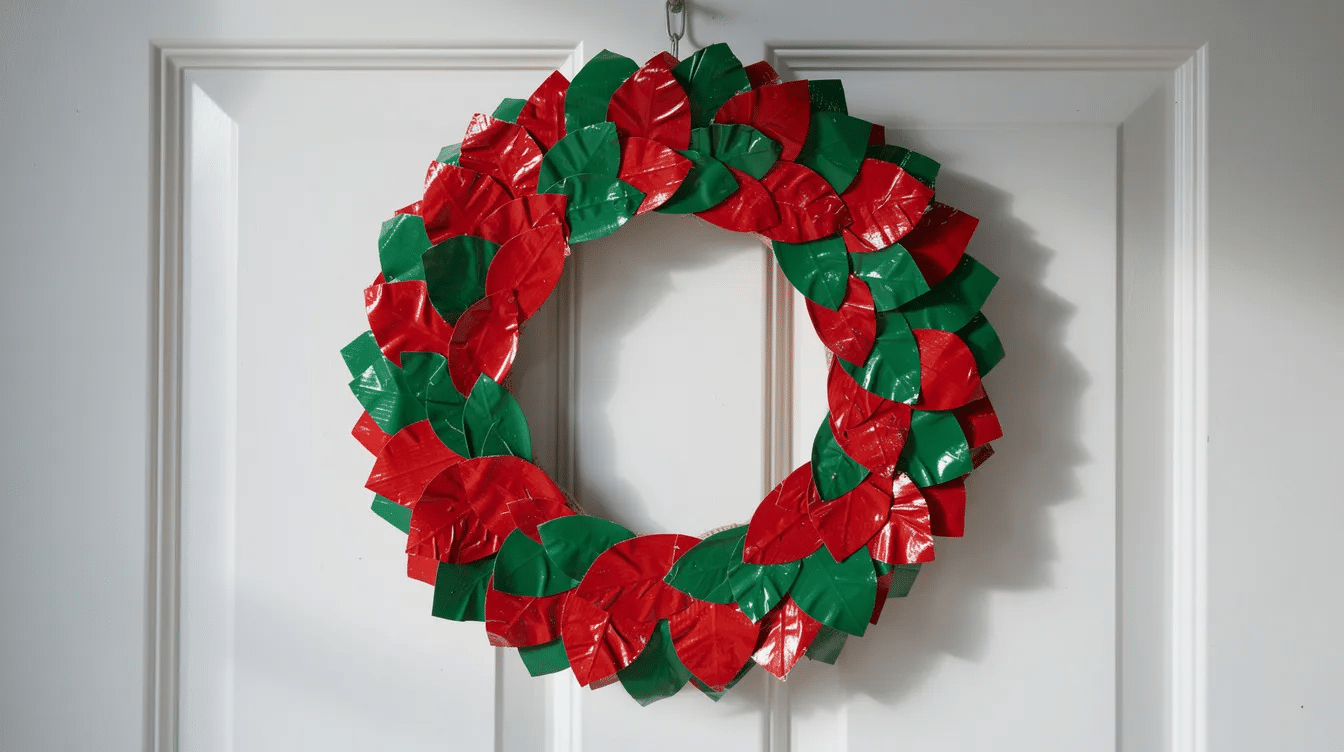
This is the main tutorial: layered “leaf” shapes made from Duck Tape, overlapped around the wreath form until every bit of the base is covered. The result is a full, festive wreath with clear leaf shapes and bright color.
Step 1: Cut the tape strips
Use scissors to cut duct tape into strips. Each strip should be about 10 inches long. Duct tape can be cut into lengths of about 10 inches to give you enough material to fold a leaf with a sticky tab at the base. For a full-size 12-inch wreath, you need approximately 90 leaves, so plan for about 45 strips if you are cutting each strip in half later, or 90 strips if working at shorter lengths.
A quick method: pull 10 inches of tape from the roll, cut it, then cut that strip in half lengthwise to create two narrower pieces, each about 0.9 inches wide. Narrower strips produce smaller, more detailed leaves. Wider strips (the full 1.88-inch width) produce chunkier leaves that cover the form faster with fewer pieces.
Step 2: Fold each strip into a leaf shape
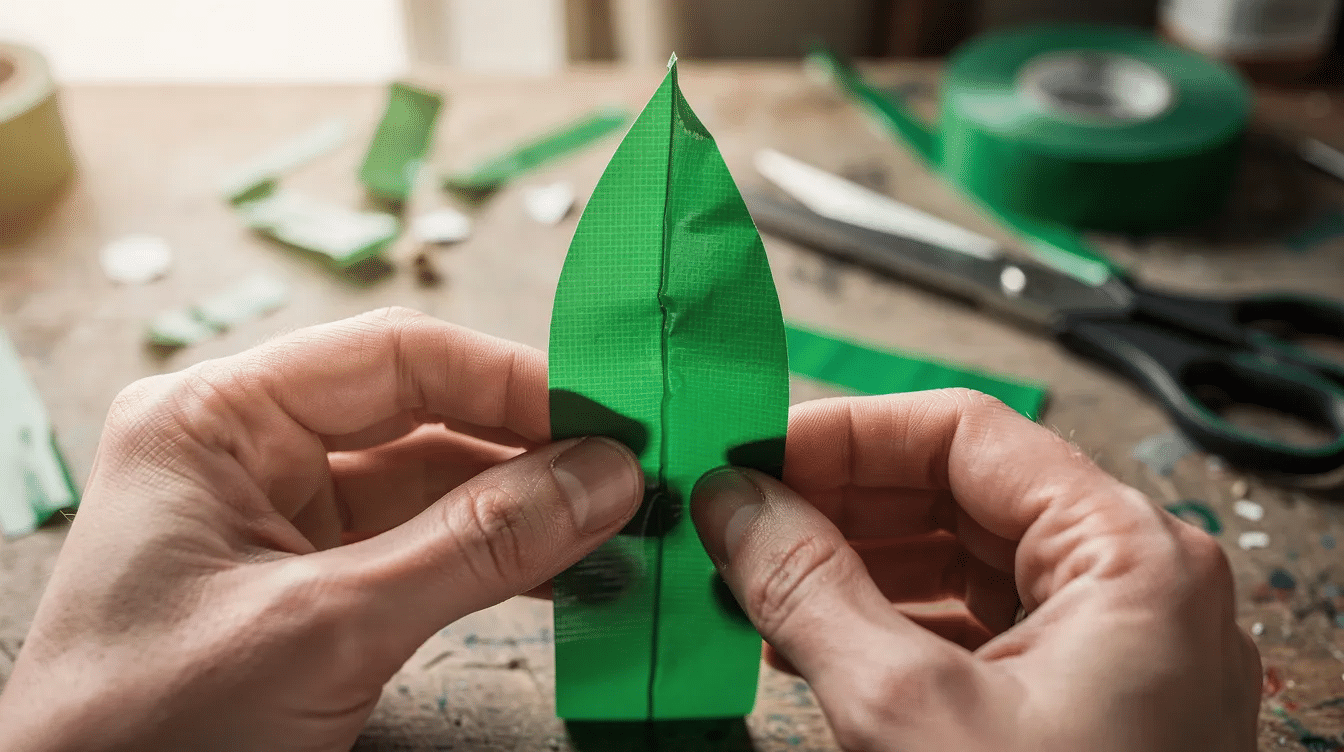
Take one strip (about 3.5 inches if you are working with shorter pre-cuts, or fold a longer strip down). Fold one end over so roughly 1 to 1.5 inches of the sticky side adheres to itself, forming a non-sticky tab. Leave the other end unfolded so the sticky tape base remains exposed. Snip the folded end into a point or a rounded leaf shape with your scissors.
You now have a leaf with a sticky base and a smooth, pointed top. Wreath-making with duct tape can involve folding techniques like this to add texture and dimension. Repeat until you have a pile of leaves ready to go.
Step 3: Arrange leaves on the wreath form
Begin at the outer edge of the foam or cardboard ring. Press the sticky tab of each leaf onto the form so the pointed end faces outward. Overlap each leaf so the base of the previous one is hidden, working in the same direction around the ring. This overlap creates layers that look lush and full.
Once the outer row is complete, start a second row slightly inside the first, with the leaf points angling inward. Continue adding rows until the inside edge of the ring is covered too. For a 12-inch foam wreath, three to four rows of leaves typically cover the entire front surface.
Step 4: Involve your preschooler
Here is where small hands get busy:
- Let your child choose which color goes next (“Do you want red or green?”)
- Have them press each leaf down firmly onto the foam
- Count together: “3 red, 3 green, 3 red” to build a simple pattern and practice early math
- Older kids (5–6) can try folding their own leaves with supervision
Using a mix of dark and light green tape can create a variegated leaf effect. Hand your child alternating shades and let them decide the order.
Step 5: Finish the base
Check the wreath for gaps where the foam shows through. Cut small triangular scraps and tuck them into bare spots. Flip the wreath over. If the back side looks messy, wrap a single long strip of tape around the inside and outside edges to cover exposed tabs. This step also reinforces the leaves so they stay put.
Step 6: Hang and admire
Your finished wreath should look full and layered, with leaf shapes radiating outward in rows. Loop a 6-inch strip of Duck Tape into a circle, sticky side out, and press it onto the back to create a simple hanger. Hang it on a bedroom door, a classroom wall, or the front of the fridge.
If you are looking for more craft activities for kids to fill the rest of the afternoon, pair this wreath with a batch of homemade ornaments or a paper snowflake session.
Fun Variations: Pleated, Metallic, and Kid-Designed Wreaths
Once the basic leaf technique clicks, you can experiment. Each of these variations uses the same wreath form and the same duct tape material but produces a different finished look.
Unconventional DIY pleated wreath
Instead of individual leaves, use long strips of patterned Duck Tape (about 10 inches each) and fold them into soft accordion pleats. Press each pleated strip onto the foam ring with the folds facing upward, so the pattern of the tape is visible on every pleat. Work around the ring in one direction, layering pleated strips until the foam is hidden. This unconventional diy pleated wreath has a modern, ribbon-like texture that looks cool on a mantel or above a computer desk. Fringed duct tape pieces can create a fuller wreath appearance if you snip the edges of each pleat before attaching.

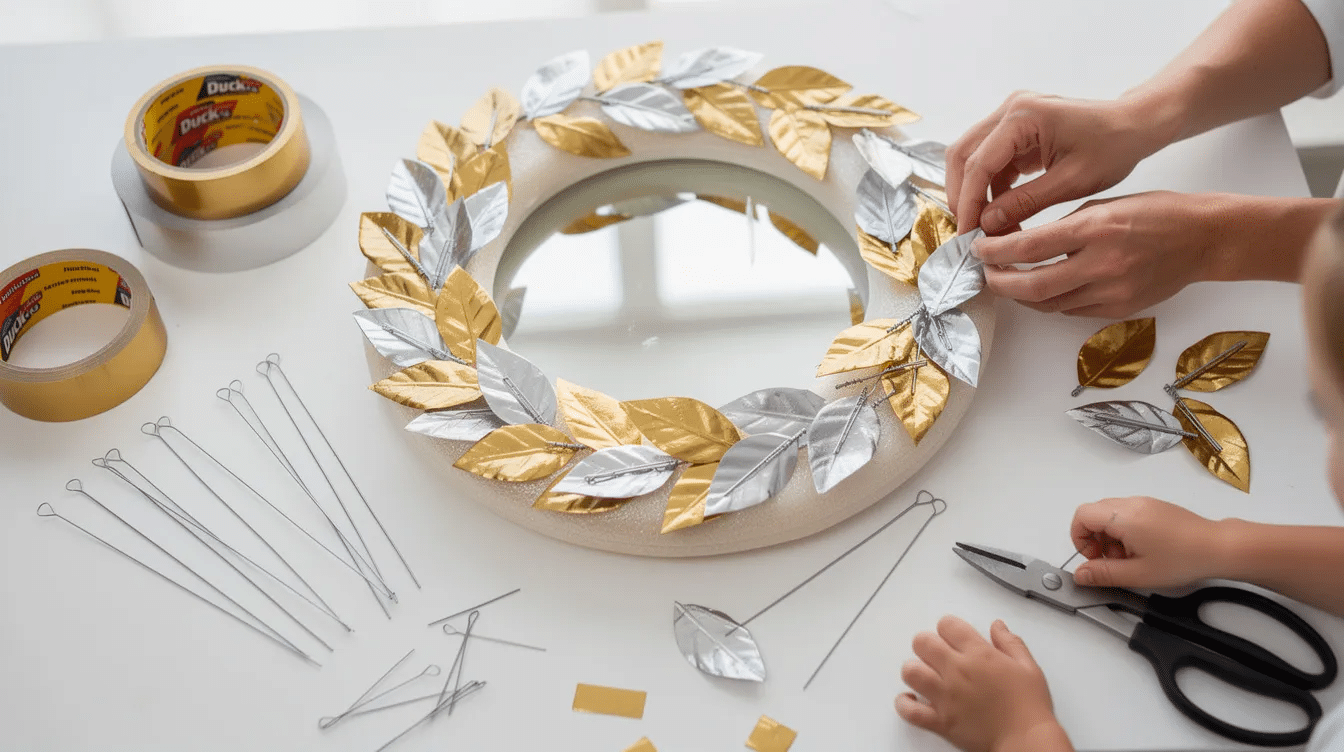
Mixed metal mirror wreath
Use metallic gold and silver Duck Tape. Cut floral wire into lengths of 4 to 5 inches and sandwich each wire piece between two layers of tape, sticky side to sticky side. Then cut around the tape to create a leaf shape with a wire spine inside. This lets you bend each leaf for a three-dimensional effect. Cluster three leaves together, all facing the same direction, and secure them to the foam ring. Repeat around the wreath. The result is a pretty, grown-up wreath that kids can still help assemble by handing you wire pieces and pressing clusters onto the form.
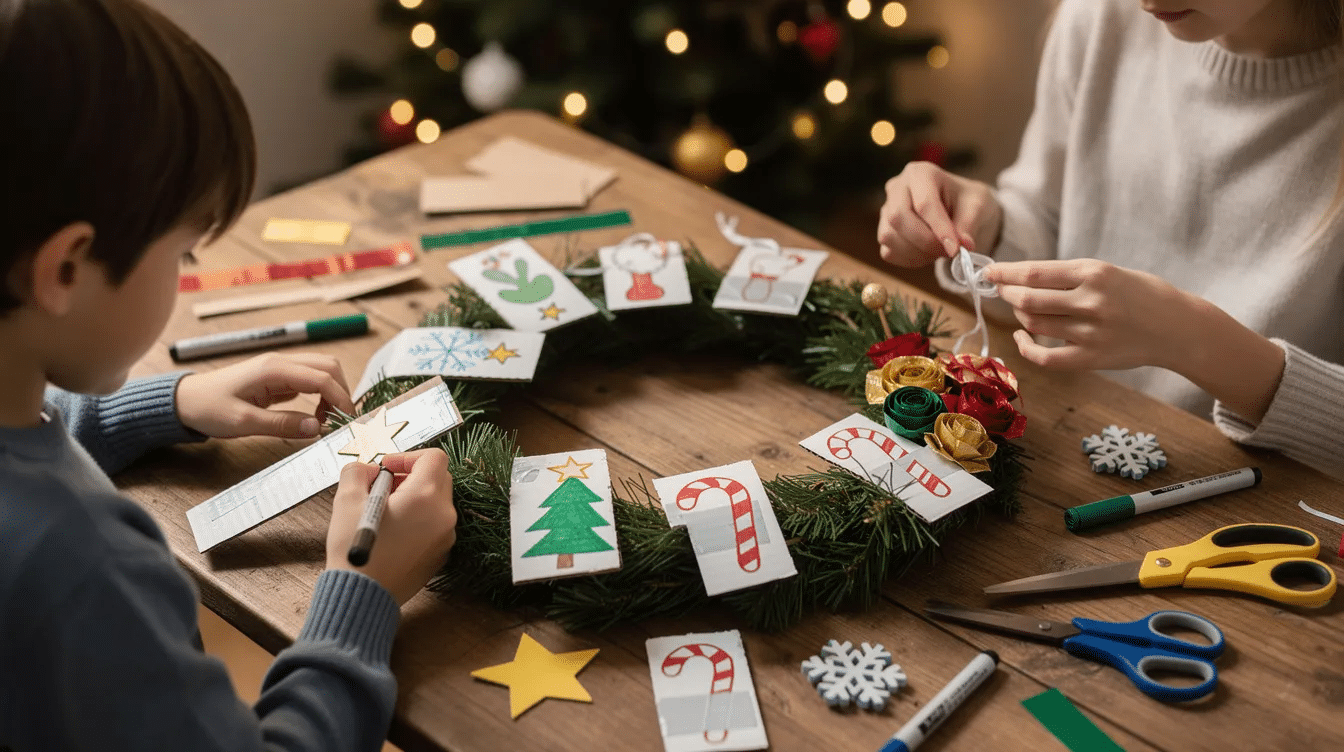
Kid-drawn “ornament” designs
Give your child strips of white or solid-colored duct tape stuck onto scrap cardboard. Let them draw Christmas icons with permanent markers: trees, stars, candy canes, snowflakes. Cut those drawings into shapes and tape them onto a finished green wreath as flat “ornaments.” Duct tape can be shaped into flowers for decorative wreaths too; show older kids how to roll small tape circles into rosettes. Small ornaments and decorations can be added to enhance wreath designs, and letting kids choose placement keeps them invested.
Bows and berry embellishments
Creating bows is a common embellishment for wreaths. Red duct tape can be used for bows and accents: cut two 6-inch strips, fold each into a loop, pinch the centers together, and wrap a small piece of tape around the middle to form a bow. Stick it at the bottom of the wreath. For “berries,” cut small circles (about the size of a nickel) from red tape, peel the backing, and dot them among the leaves in clusters of three.
Quick themed ideas
Duct tape can be used to create themed wreaths for almost any occasion:
- School colors: Pick two rolls in your child’s school colors for an older kid’s bedroom door
- Glow-in-the-dark: Duck Brand sells glow tape; a ring of glowing leaves on a bedroom door is a wow factor at bedtime
- Two-color toddler version: Use only two colors and a smaller 8-inch foam ring for kids with short attention spans; 40–50 leaves instead of 90, done in 30 minutes
For more inspiration and easy craft ideas that work for multiple ages, browse the full list of projects on the blog.
Display, Storage, and Kid-Friendly Safety Tips
Getting the most out of your Duck Tape Christmas wreath means displaying it where it shines, storing it so it survives until next December, and keeping the craft safe for little hands.
Hanging your wreath
- Interior door: Loop a strip of Duck Tape into a hanger on the back, then hang it over a removable adhesive hook. No nails, no damage.
- Railing or peg rail: Tie a ribbon loop through the center of the ring and drape it over the rail.
- Classroom wall: Use poster putty or a command strip on the back side.
Indoor vs. outdoor use
Duct tape’s three-layer construction (rubber adhesive, cloth scrim, polyethylene backing) resists moisture, but a Duck Tape wreath lasts longer indoors or on a covered porch. Direct rain, snow, and sun will cause colors to fade and edges to peel within a few weeks. A sheltered spot under an overhang is fine for the holidays.
Storage for next year
- Wrap the wreath loosely in tissue paper so the leaves do not stick to each other
- Lay it flat in a shallow box; label the box so you find it next December
- Store in a dry closet or under a bed; avoid the attic or garage where summer temperatures above 90°F can soften the adhesive
Safety reminders
Risk | Solution |
|---|---|
Scissors | Adults cut for toddlers; child-safe round-tip scissors for ages 5+ |
Small parts (bells, buttons) | Keep away from children under 3 who still mouth objects |
Sticky tape on skin/hair | Remind kids that Duck Tape is not for skin, hair, or faces |
Latex sensitivity | Duck Tape is not latex-free; if your child has a latex allergy, test a small piece on a non-sensitive area first or choose a latex-free alternative tape |
Share your finished wreath
We love seeing what families create. Snap a photo of your child holding the finished wreath and tag Little Button Diaries on facebook or pinterest. If you pinned this post, send us a link; Rachel and Emily on the team are always thinking about which reader designs to feature. Your comments, photos, and ideas help other parents find inspiration for their own holiday crafting. Thanks for sharing.

Frequently Asked Questions
Can I make a Duck Tape wreath without a foam form?
Yes. A free cardboard ring works well. Trace a large dinner plate for the outer circle and a smaller bowl for the inside circle onto a sturdy piece of cardboard, then cut carefully with scissors or a craft knife (adults only). Cereal boxes, shipping boxes from online orders, or old gift boxes from last Christmas are ideal upcycling sources. The cardboard version is flatter than a foam wreath, so your leaves will sit closer together, but the finished look is still beautiful. If you want more DIY activities that reuse household materials, the blog has a whole collection.
Is duct tape safe for young kids to use?
Duct tape and Duck Tape are both fine for supervised crafts. Adults should handle cutting and tearing, and help younger children avoid wrapping tape around fingers or hair. For toddlers, pre-cut all the pieces and set them along the edge of the table with the sticky side facing up so kids just peel and stick. This keeps the fun decorating part front and center while you manage the stuff that requires tools. Showing them how to press each leaf onto the ring gives them a real job without any risk.
How long will a Duck Tape Christmas wreath last?
Kept indoors or on a covered porch and stored flat in a dry place between seasons, a Duck Tape wreath can last several Christmas seasons without peeling. The rubber-based adhesive in duct tape holds well at room temperature but degrades in extreme heat. An attic in summer can reach well over 100°F, which softens the glue and causes layers to separate. A wardrobe, under-bed box, or hallway cupboard is a better storage spot. With simple care, three to five years of reuse is realistic.
Can I use washi tape or masking tape instead?
Washi and masking tape are usually too thin and not sticky enough to create sturdy leaves that hold their shape. They peel off the foam within a day or two. They can, however, be layered over duct tape for extra patterns or used as surface decoration on top of a duct-tape base. If washi is all you have, try a test on a small cardboard ring first. For a wreath you want to keep and reuse, Duck Tape gives the best durable result; the thicker backing and stronger adhesive are what make the leaf shape hold its point over time.
What is the best way to involve a whole preschool class?
Let each child decorate one or two duct tape leaves or small cardboard shapes at their own seat. The teacher or caregiver then assembles all the pieces into one large group wreath for the classroom door. This splits the 90-leaf workload across 15 to 20 kids, so each child only needs to make four or five pieces. Label the back with the class name and year (for example, “Preschool Christmas 2026”) and use it as a keepsake the class can bring out every December. It is a simple, updated version of the classic paper-plate wreath, but far sturdier. For more group-friendly projects, check out preschool crafts about family on the blog.


