

Key Takeaways
- This project uses homemade cloud clay (2 cups cornstarch + 1 cup hair conditioner) or store-bought air dry clay to create a hanging cloud mobile for nurseries, kids’ rooms, or preschool cozy corners.
- The entire craft takes one afternoon of shaping and painting, plus overnight air drying before assembly.
- No kiln or special tools needed; a rolling pin, cookie cutters, a drinking straw, and a wooden embroidery hoop or dowel handle the job.
- Always use non-toxic, water-based acrylic paints and seal finished clay pieces with a water-based varnish to protect them from dust and little fingers.
- Supervise children under 6 when handling clay and small parts; keep the finished mobile at least 30 cm (12 inches) above a baby’s reach.
A Soft Cloud Mobile You Can Make in an Afternoon
A cloud clay mobile is a hanging decoration made from soft, lightweight clay shaped into a puffy cloud with tiny raindrops, stars, or hearts dangling underneath on thread. Picture a white cloud shape floating above a changing table, with pastel raindrops swaying gently at different heights. That’s what you’re making today.
This project is written for parents of 2 to 6 year olds, grandparents looking for a weekend activity, and early years teachers who want a low-mess, low-cost room decoration. No kiln, no polymer clay oven timer, no fuss. Your clay pieces simply air dry on a tray overnight while everyone sleeps.
Below, you’ll walk through mixing cloud clay from scratch, shaping and drying the pieces, painting and sealing, and assembling the finished mobile. Each section includes age-appropriate tips so even the youngest crafters can join in.

What Is Cloud Clay (and How Is It Different From Air Dry Clay)?
Cloud clay is a two-ingredient modeling material: mix cornstarch and hair conditioner in a bowl, knead it together, and you get a soft, marshmallow-like dough that holds simple shapes. The standard ratio is 2 parts cornstarch to 1 part conditioner, so 2 cups cornstarch plus 1 cup conditioner makes enough for a single mobile.
Shop-bought air dry clay is a different material. Air-dry clay is often called lightweight foam clay because it contains natural clay minerals, binders, or cellulose fillers that cure into a rigid, paintable solid once exposed to air. Brands like Crayola and DAS produce versions labeled safe for ages 4 and up.
Here’s how they compare for this project:
Feature | Homemade Cloud Clay | Store-Bought Air Dry Clay |
|---|---|---|
Texture when wet | Fluffy, squishy, very soft | Smooth, firm, holds crisp edges |
Drying result | Stays slightly pliable, fragile | Hardens fully, can be sanded |
Weight | Very light | Light but heavier than cloud clay |
Detail level | Low; best for simple forms | High; fine details possible |
Lifespan of finished piece | Weeks to a few months | Months to years when sealed |
Cost | Pennies (pantry ingredients) | $5–$12 per 500 g block |
Use cloud clay if your child is younger and the sensory play matters as much as the result. Use air dry clay to create cloud shapes that will last through a nursery stage or serve as a baby shower gift that holds up for years.
Both options air dry on the counter. Neither requires an oven or kiln.
Materials You’ll Need for a Cloud Clay Mobile
Gather these materials before you start. Everything fits on a kitchen table.
For homemade cloud clay:
- 2 cups cornstarch
- 1 cup white hair conditioner (unscented and dye-free reduces skin irritation risk)
- Optional: 1 teaspoon white acrylic paint or a drop of food coloring
Alternative: A 500 g block of white air dry clay if you prefer not to mix your own.
Tools and supplies:
- Rolling pin
- Cloud and rain drop cookie cutters (or a butter knife and paper template for freehand shapes)
- Drinking straw for poking hanging holes
- Wooden embroidery hoop (15–20 cm diameter) or a wooden dowel (30 cm long)
- Cotton thread, white yarn, or clear fishing line
- Small paintbrushes
- Baking tray lined with parchment paper
- Non-toxic, water-based acrylic paints (look for the ACMI AP seal or ASTM D-4236 compliance)
- Water-based sealer or matte Mod Podge
- Super glue (adults only, for fixing broken pieces or securing magnets in variation projects)
How to Make Cloud Clay at Home (2 Ingredients)
This recipe takes about five minutes from start to a pliable ball of dough.
- Pour 2 cups cornstarch into a medium bowl.
- Add 1 cup white hair conditioner.
- Stir with a spoon until the mix starts to clump together.
- Tip the mixture onto a clean surface and knead with your hands for 2–3 minutes.
- The finished dough should feel like soft marshmallow: smooth, not wet, and able to hold its shape without sticking to your fingers.
Troubleshooting:
- If the dough is crumbly, add conditioner a teaspoon at a time and knead until it comes together.
- If it feels sticky, dust with a tablespoon of cornstarch and fold it in.
- For a tinted batch, work in a teaspoon of white acrylic paint for a brighter white, or add a single drop of food coloring for a pale sky blue or soft pink.
Storage: Wrap any excess clay tightly in cling film and press it into an airtight container. Stored this way, leftover clay stays workable for 2–3 days. If it dries slightly, knead in a pea-sized bit of conditioner to revive it.

Designing Your Cloud Mobile: Simple Layout Ideas
Before you roll out any clay, sketch a quick design on paper. Keeping shapes simple saves time and avoids frustration with younger children.
A classic layout: one large central cloud with 5–7 hanging raindrops. Cloud clay mobiles can be designed with themes like celestial (moons and stars), botanical (tiny leaves and flowers), or the ever-popular kawaii smiling cloud with pastel rain.
To balance the mobile, distribute weight evenly along the frame. If you hang four raindrops on the left side of the cloud and one on the right, the whole thing tilts. Spread your shapes out, or use a wooden hoop as the frame so weight distributes around a circle.
Aim for a total length of 40–60 cm (16–24 in) from the top hanging loop to the lowest rain drop. That size works above a changing table or in a reading nook without overwhelming the space.
Finish your sketch, pick your colors, and decide on a piece count. Six to ten hanging shapes fill out a single cloud mobile without looking cluttered.
Shaping the Main Cloud From Cloud Clay or Air Dry Clay
Roll the clay between two sheets of parchment paper using a rolling pin. Press to a thickness of about 5–8 mm (roughly ¼ inch). When crafting with air-dry clay, keep the pieces thin and lightweight; thick pieces take longer to dry and are more likely to crack.
Cloud-shaped cookie cutters can be used to form shapes from clay. If you don’t have one, lay a paper template of a puffy cloud outline over the rolled sheet and cut around it with a butter knife. Peel away the excess clay and set the cloud shape on a parchment-lined tray.
Smooth the edges by rubbing them gently with a slightly wet fingertip. This removes small cracks and gives the bottom edge a rounded, polished look. If using air dry clay, keep a dish of water nearby for wetting your fingers; the clay responds well to a damp touch.
Now poke holes for hanging strings before the clay dries. Use a drinking straw to push 3–7 evenly spaced holes along the bottom edge of the cloud where the raindrops will hang. Make 3 holes in each cloud for hanging: the bottom ones for raindrops and 1–2 holes at the top for the hanger string or hoop attachment.
Older children can press in tiny indentations for a kawaii face: two small dot eyes and a curved smile that you’ll paint later. A toothpick or the blunt end of a paintbrush works well for this step.
Creating Raindrops, Stars, and Extra Cloud Charms
- Roll a small ball of clay (about the size of a grape), press it flat to 5 mm, then pinch one end into a teardrop point for a rain drop shape. A raindrop cookie cutter speeds this up if you have one.
- For stars or hearts, use mini cutters or freehand with a knife. Keep pieces a similar size so they balance when hanging.
- Poke a hole near the top of each shape with a straw or skewer, just like you did in the previous step for the cloud.
- Using textured tools (a fork, a piece of lace pressed into wet clay, or the cap of a pen) can give clay pieces a unique design, adding a bit of personality to each rain drop or star.
- Mix two colors of clay for a marbled effect in crafts: take a chunk of white and a chunk of tinted clay, twist them together gently, and roll flat. Stop before the colors blend fully for pastel swirl raindrops.
- Aim for 6–10 hanging shapes total. That number fills the mobile without weighing it down.

Drying Your Clay Cloud and Raindrops Safely
Both homemade cloud clay and shop-bought air dry clay need a calm, flat surface and patience. Transfer your shapes to a parchment-lined tray and leave them in a warm, dry room away from direct sunlight.
Cloud clay typically air-dries within 24 to 48 hours for pieces at 5–8 mm thickness. Thicker pieces of air-dry clay take longer to dry than thinner pieces; a 10 mm slab could need 72 hours or more in a humid room.
The drying process goes like this:
- After the first 12–24 hours, flip each piece over so the underside gets air.
- Wait another 12–24 hours.
- Check for dryness: pieces feel cool but hard, show no soft spots when pressed, and the color looks lighter or chalky.
If edges start to curl during the drying process, press them under a flat book for an hour after flipping. Avoid placing pieces near a radiator or in direct sun; uneven heat causes cracks and warping. Let everything dry completely before moving on to paint.
Painting and Sealing Your Cloud Clay Mobile Pieces
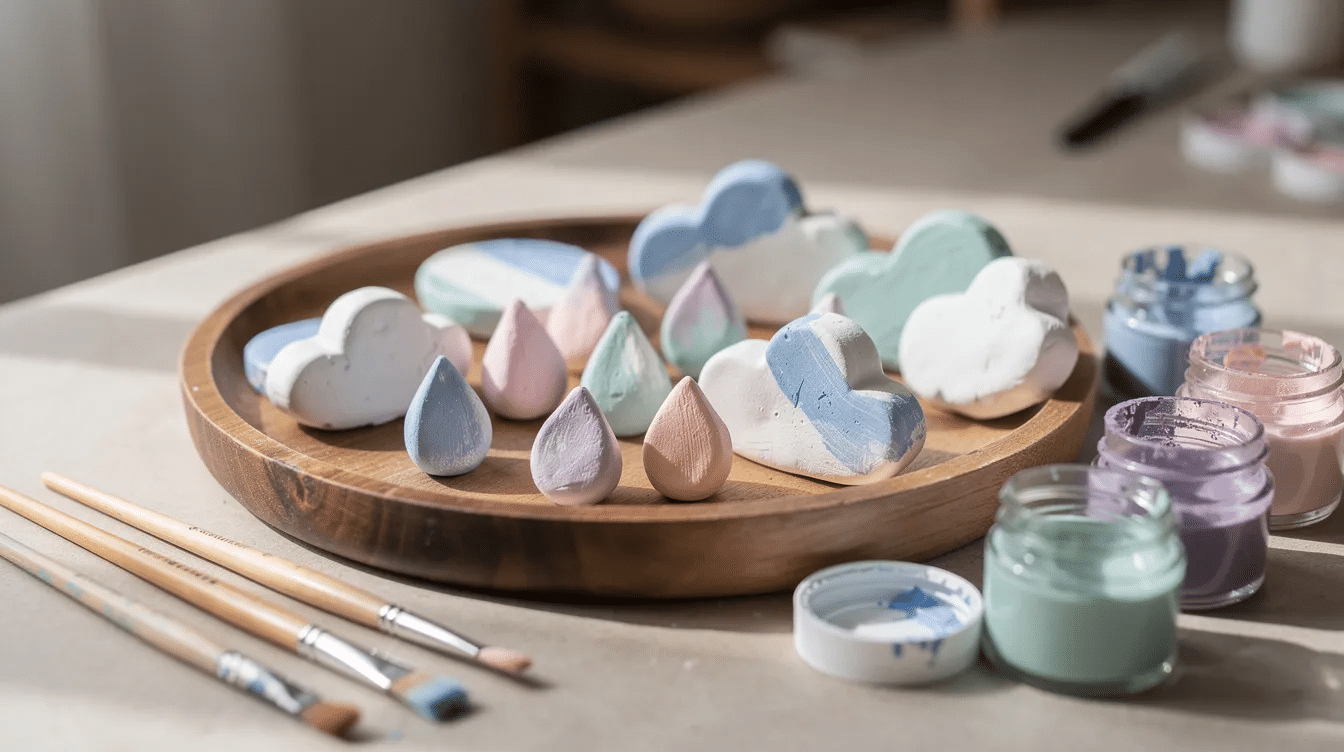
Paint clouds with water-based, non-toxic paint. Classic palettes for a nursery mobile include a white cloud with pastel rainbow drops, a soft grey storm cloud with blue raindrops, or baby blue stars against a white clay cloud.
Start with a base coat of white acrylic if the conditioner left a slight tint on your cloud clay. Let that coat dry, then paint your chosen colors. For kawaii faces, use a fine brush to add two small dot eyes and a tiny curved smile. Rosy cheeks are easy: dab a dry brush lightly into pink paint, tap off the excess, then dust over the cheek area.
Try soft gradients by watering down acrylic paint and dabbing it on with a sponge for a dreamy sky look. Layer colors; let each layer dry before adding the next. If you’re curious about other painting techniques, our guide to painting air dry clay with watercolors covers more options.
Once paint is dry, apply a second coat of water-based sealer or matte Mod Podge. Two thin layers of sealant, dried fully between coats, protect from dust and sticky fingers. Seal finished clay elements with a water-based varnish to lock in color and add a subtle sheen. Let everything cure according to the product label before assembly.
Assembling Your Hanging Cloud Mobile
Cut several strands of white cotton thread, yarn, or clear fishing line. Use clear fishing line or string to hang pieces of a mobile if you want the raindrops to look like they’re floating. Different lengths of string create a more visually appealing mobile; vary from 8 cm to 18 cm so the drops sit at staggered heights.
Threading the shapes:
- Slide thread through the hole in a raindrop or star.
- Tie a secure double knot at the back and trim excess thread close to the knot. A small dot of super glue on the knot keeps it from slipping over time (adults only for this step).
- Thread the other end through a hole along the bottom edge of the cloud.
- Adjust length, then tie and trim inside the hole.
- Repeat for each hanging shape.
Hanging options:
- Embroidery hoop: Tie the top of the cloud to a wooden embroidery hoop. Attach three equally spaced strings from the hoop’s rim up to a single ceiling hook. This balances the mobile by distributing weight evenly along the frame. Use a sturdy frame like a wooden dowel or embroidery hoop for hanging mobiles; flimsy wire or cardboard will sag.
- Direct hang: Thread a single stronger cord through the top holes and tie it in a loop. Hang from a ceiling hook. Simpler, but the cloud may tilt if shapes aren’t perfectly balanced.
Use fishing gut to hang the clouds if you want near-invisible suspension.
Safety: Keep mobiles well out of a baby’s reach: at least 30 cm (12 inches) above grasping hands, hung from a secure ceiling hook or wall bracket. Check knots and attachment points before walking away.
Age-by-Age Tips: Crafting With Toddlers vs Preschoolers
Ages 2–3: Focus on the sensory side. Let little ones squish and roll cloud clay, press cookie cutters, and form simple ball shapes. Adults handle cutting, poking holes, painting details, and all assembly. Keep shapes large to avoid choking hazards. If your child enjoys tactile play, our sensory art activities for special needs post has more ideas.
Ages 4–5: Children at this stage can design their own cloud faces, choose paint colors, push a straw through soft clay to make holes (with supervision), and help thread thick yarn through larger holes. Let them paint base coats; save tiny details for a grown-up brush.
Ages 5–6: Encourage more independence. They can draw a template, cut a simple cloud outline with a butter knife, paint layers including rainbow stripes or star sprinkles, and help tie knots in the assembly stage.
Managing the mess: Protect the table with a wipe-clean cloth or old shower curtain. Tie back long hair. Old t-shirts or aprons save clothes from paint and cornstarch dust. The best part of cloud clay is that it washes off hands and surfaces with just water.
Variations: Turn Your Cloud Clay Into Other Soft Sky Crafts
If the mobile inspired you and you still have leftover cloud clay or a half-used block of air dry clay, here are more ways to use air dry clay to create cloud-themed crafts.
- Mini cloud magnets: Form tiny clay clouds, let them dry completely, paint sleepy faces, then glue small magnets on the back. Cloud trinket dishes provide a whimsical storage solution too: press a ball of clay into a small dish shape, curve the edges upward like a cloud, and dry flat.
- Cloud bag tags: Stamp flat cloud shapes with children’s initials using alphabet stamps, poke a hole, thread with jute twine, and hang from backpacks or use as gift wrapping tags.
- Cloud pencil toppers: Cloud pencil toppers add charm to ordinary writing utensils. Form a small cloud, push it onto the eraser end of a pencil while still soft, then remove carefully, dry, and paint. Slide back on once sealed.
- Kawaii cloud figurines: Kawaii cloud figurines are beginner-friendly sculpting projects. Shape a log of clay into a rounded cloud body, flatten the base so it stands, and press in a smile. Paint pastel cheeks once dry.
- Expanded mobile: Cut out 8 cloud shapes in 4 sizes and hang them at different heights from a wooden hoop. Cloud mobiles can be made with four different cloud sizes, giving the finished piece a layered, sky-like depth that looks striking above a crib.
- Cloud and moon jar scenes: For older kids, glue tiny air dry clay clouds and crescent moons inside a clean jam jar for a “mini sky world.”
For more project ideas using everyday materials, browse our craft activities for kids collection or our roundup of cute easy crafts.
Safety, Durability, and Where to Hang Your Cloud Mobile
Mobiles are decorations, not toys. Hang them out of reach of babies and toddlers to prevent entanglement and choking hazards.
How long do they last? An air dry clay mobile, sealed with two coats of water-based varnish and kept in a dry room, lasts months to years. A homemade cloud clay mobile is more fragile; expect weeks to a few months of display life depending on humidity.
Good hanging spots:
- Above a changing table (high enough that baby cannot grab)
- Over a reading nook or book corner
- By a bedroom window (avoid direct rain splash on the walls)
- In a preschool quiet corner
Avoid: steamy bathrooms, spots directly above radiators, and outdoor walls. Moisture and heat weaken clay over time, even when sealed.
Check knots, thread, and ceiling hooks occasionally. If a strand looks frayed, replace it. If a raindrop cracks, treat it as a mini craft session: shape a new one, paint to match, and tie it on.
Storing Leftover Cloud Clay and Caring for the Mobile
Wrap unused cloud clay tightly in cling film and press into an airtight tub. If the dough feels dry after a day or two, knead in a pea-sized blob of conditioner to make it pliable again. Stored this way, it stays usable for 2–3 weeks.
Unused shop-bought air dry clay should stay in its original packaging, wrapped in plastic, and sealed in a container. Once exposed to air, it begins to firm up within hours.
Mobile care tips:
- Dust gently with a soft, dry paintbrush or microfiber cloth.
- Avoid wet cloths; water can mark painted surfaces or soften cloud clay.
- If a piece breaks, make a replacement from a fresh bit of air dry clay, let it dry completely, paint to match, and tie it on. Repairs become their own little craft moment.
For even more weekend projects, take a look at our hand crafting ideas collection.
Frequently Asked Questions About Cloud Clay Mobiles
Can I bake cloud clay in the oven to make it dry faster?
Homemade cloud clay is not formulated for oven use. The conditioner base can puff, crack, or discolor under heat. Stick to air drying at room temperature. If you need to speed things up, place pieces in a warm, dry room with a fan on low setting. Do not put them on top of a radiator or in direct sunlight; that causes uneven drying and surface cracks.
Is cloud clay safe if my toddler puts it in their mouth?
Cloud clay is not edible. Hair conditioner contains ingredients not intended for ingestion, even though cornstarch on its own is a food product. Supervise children under 3 closely, use larger shapes with no small detachable parts, and wash hands after every crafting session. If you need a fully taste-safe dough for very young toddlers, consider a simple flour-and-water play dough instead; it won’t produce the same fluffy texture, but it removes the conditioner concern.
Can I use salt dough instead of air dry clay for the mobile?
Salt dough works for flat decorative shapes if baked thoroughly, but it is heavier and more brittle than air dry clay. A salt dough cloud mobile puts more strain on thread and ceiling hooks. If you choose salt dough, seal it with at least two coats of varnish and hang the mobile away from bathrooms or kitchens where steam could soften the surface.
How do I stop cracks from forming in my air dry clay cloud?
Knead air dry clay thoroughly before rolling to push out air pockets. Keep a consistent thickness across the entire cloud shape; thin spots dry faster and pull away from thicker areas. Small surface cracks that appear during drying can be smoothed with a damp finger. Tiny gaps after full curing can be filled with a bit of fresh clay, then sand lightly once dry.
Can I make the cloud mobile as a baby shower or first birthday gift?
A handmade clay cloud mobile makes a personal, one-of-a-kind gift. Paint it in the nursery’s color palette, wrap it in tissue paper, and include a small note reminding parents that it is decorative only and should hang well above the baby’s reach. Packaging each piece separately with a layer of tissue between them prevents chips during transport.


